This time of year, you hear the term ‘cold crops’ in your garden center. While everyone is anxious for tomatoes, if you try to plant them now you will likely have a frost that will kill the tender plant. You can successfully plant cold crops now to satisfy your garden ‘itch’ until the soil warms up enough to handle the tender crops.
What is a cold crop
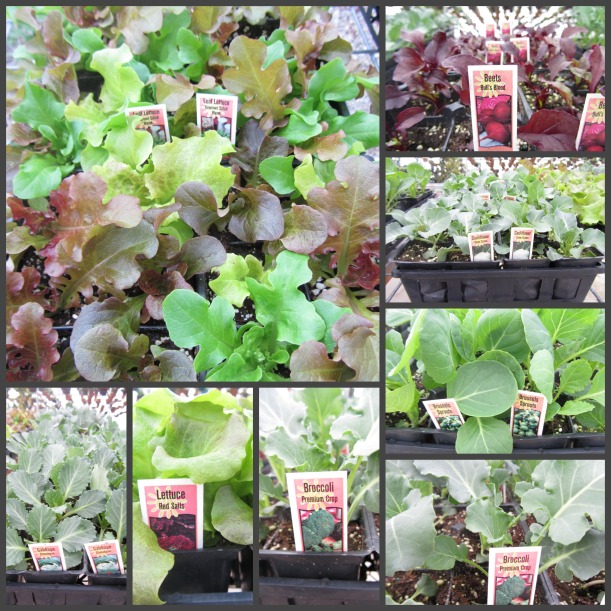
A cold crop is a term used for vegetable starts/plants that can take a little bit of frost and can be planted in the ground before the soil warms up. For our zone, cold crops include:
beets
broccoli
Brussels sprouts
cabbage
cauliflower
lettuce
onions
These plants are also pre-hardened off for weeks before they are available for purchase; they have been out in a greenhouse exposed to cold temperatures for best performance in your garden.
So while you are waiting for the precious tomatoes, you can find these plants on the shelves in April. If you are really into gardening and can’t wait to start your garden this is a line of plants that will let you get a little fix till the rest can go into the ground.
March in the Northwest is unpredictable as well as April. Here are some things that you should be thinking about in your northwest garden this month.
Last year’s refuse needs to either be worked into the ground in our gardens or if old stalks and stems are too large and bulky you can add it to your compost pile.
Compost piles are valuable assets for building humus material for the soil. Humus (or rotted plant stems and leaves) is essential for well aerated soil profiles. If you are using a compost pile, take the time to add nitrogen, bone meal and other nutrients into the pile. The nitrogen will help to break down the carbon while the bonemeal and other elements will be available in a usable form when we add the finished compost back into the garden. For more information on how to start your own compost pile at home click here.
If you are able to work last years decayed plant material into the soil, make sure and mix any additives into the garden before you turn the soil over.
March is a time when all the cold weather weeds and grasses begin to germinate and grow. So, if you can turn the soil in your garden a couple of times prior to planting the early crops, you will be assured of less work when it comes to weeding the garden later. As a gardener you should want to watch and when there is a new flush of weed seeds germinating and appearing you can turn the soil so all the small weeds will die.
As the end of March approaches it will be time to plant:
Potatoes
Strawberries
Cold Crops
Cabbage
Broccoli
Brussels Sprouts
Lettuce and any other leafy cool weather crop
Be sure to watch our Facebook page, website and YouTube Channel for more information about Spring preparation and planting.
Are you tired of coming out to find your beautiful bulbs with no flowers left? This is happening more and more. However there is good news, there is two way to combat against these crimes against flowers.
1) On the market there are now several products you spray that detour deer from wanting to eat your plants. They are not harmful to you, your children, other pets, deer or flowers they just give off an odor that the deer wishes to not be around
2) There are some bulbs that are deer resistant. Deer resistant however does not mean deer won`t touch them, it just mean unless they are really hungry they will avoid them. They are the following:
Allium
Crocus
Dwarf Iris
Early Stardrift
Fritillaraia
Glory of the Snow
Grape Hyacinth
Lily of the Valley
Scilla
Snowdrops
Winter Aconite
Narcissus Or Daffodils
Hyacinth
These sets when combined should help greatly with your problem however if your deer are very hungry nothing will keep them from eating.
Do you want to create a haven for hummingbirds? Do you want to attract species like: Anna’s, Black-Chinned, Calliope, Ruby Throated, Rufous, and Allen’s?
Plant flowers and shrubs that attract them. Here is a list of flowers and shrubs that they like, so plant with confidence! If you plant them, they WILL come.
My favorite Annuals for Hummingbirds, Anything Red or Orange. These are not in alphabetical order, just as they come to my mind which is like a tornado this time of the year.
Salvia, verbena, petunias, calibrachoa, cuphea, fuchsia, celosia, heliotrope, nemesia, mimulus, nicotiana, red geraniums, torenia, nasturtium, lobelia, alyssum, salvia, scaveola, helitrope, fushia, morning glory, black eye susan vine, abutilon, diascia, lotus, and lantana.
NECTAR
Make sure that you have fresh nectar for the hummers. lf you have feeders hanging out and they are not licking out the nectar, it has probably gone rancid. Clean your feeders and put fresh food in it for them. Again the recipe for home made hummingbird nectar is as follows:
One cup sugar
Four cups water
Bring to a boil in a pan for about 5 minutes. The boiling part makes it into a simple syrup and it keeps longer as a syrup than just sugar and water mixed. Fill your feeders and store the remainder syrup in your refrigerator. I usually have to make this mixture twice a week. Make sure that it is not boiling or hot when you put in the feeders. The hummers would burn their little tongues and that would be really bad.
Can you still plant tomatoes????? The answer is yes, yes, absolutely yes! Tomatoes love hot weather (which I guess we are still waiting for) but they also like the soil to be warm. We are just now getting to the point where the soil is warm enough to successfully plant everything. You can plant Tomatoes sooner but the plants will not do much until the soil warms up.
If you bought tomatoes plants and did not have time to plant them and now they are huge or the only tomatoes plants in the garden center are long don’t worry, – – – plant them. If given the choice between a short tomato plant or a long tomato plant I always choose the bigger one. I dig a ditch and plant the tomato plant on its side and cover it up to the top portion of the leaves. The long part that you buried will turn into roots and make a stronger plant.
Before I started my Urban Garden I used to plant all the leftovers from the greenhouse into the field. I paid my way through college by raising a truck garden full of overgrown vegetable plants. I was always the last guy to plant because there was never time until the busy shipping season was over. Most years I never planted a garden until after Memorial Day
The really tough decision is deciding what kind of tomatoes you want to grow. There are the big ones, medium size, and of course the little cherry tomatoes. One of the most popular ones for our area is a medium size Early Girl. I love Sweet 100’s cherry tomato. It is like eating candy off of the plant. The little yellow Sun Sugars are even better than the red Sweet 100’s.
This year I planted my raised beds on May 29th. When I was looking for a Sun Sugar I found a big gallon multi branched plant and put it in an Yellow Tomatoes Cage. I’m looking forward to grazing a few tomatoes off the vine as I’m out there picking some slicing cucumbers for lunch. I think I’m going to plant my strawberry patch today. There are some big plants in the greenhouse with strawberries on them already. I’ll be eating berries before the guys in Greenbluff even get their signs up.
If you have been procrastinating about planting or replanting now is definitely a great time.
Wow! I can’t believe how big this Spider Plant has gotten in just one month…In early February we had a kids class about planting. We painted 6″ posts and planted 2 1/4″ plants in preparation of transplanting them into the 6″ pot when they were ready. It was a lot of fun to see all of their little creative minds working.
I took home the sample Spider Plant that I put in a glass pot so we could see all of the roots. In just one month this Spider has doubled its size!
Here is a look at the roots. In the class we talked about what plants need to grow well. We decided that it is very much like what humans need to grow: air, light, water, food.
I just think it is so cool to see the roots of a plant.
This month’s Kids Class will be held on March 17th. We will be planting a plant that is very popular on March 17th. Have you guessed what it might be? ……… A Shamrock!
Here are some of the words that we will be talking about in class: Shamrock, Bulb, Green, Purple, Flower and Sleep. Can you guess what these words have to do with a Shamrock.
Here in Spokane we are very concerned with clean air, as good stewards of the environment we would like to clean our air as naturally as possible and we can do that with the judicious use of plants. Plants were designed to clean the air, that’s why when you go down a dusty road the trees that surround the road are covered in the dust. The plant’s leaf or needle is doing what it was made to do and trapped the dust from the air. Granted the tree desperately needs a cleaning after a long dry summer, and that happens, in the form of rain that comes later. In several ways the tree does benefit from this exchange. Dust that collects on leaves is ultimately washed down to the roots of the tree. The nutrients attached to that dust are then used by the tree as it grows the next season. Remember when Mt. St Helens blew up, all the dust/ ash that covered everything. The so called experts said “wait, don’t touch it, it will turn into sulphuric acid and ruin everything, including the paint on the cars.” Everybody with common sense went out and immediately washed the ash off of their houses and cars, everybody else washed later. Well the experts were partially right, chemically speaking, sulphuric acid was formed, but in small quantities, just enough to reduce the PH of our already alkaline ground and allow the farm crops to uptake more of the newly available fresh fallen nutrients. This in turn resulted in record harvest for the year. So how can plants and their ability to catch dust become a benefit to you?
Plants can also humidify and cool the air around them. Moisture in the soil is collected by plants through their root system and then transpired back into the air. If you have ever driven by a large alfalfa field in the summer you have felt the coolness drifting off the field. That is the moisture in the field cooling the air around the field through the process of transpiration. Recently several people have asked what plants work well within the home for removing dust from the air and adding humidity and oxygen back into the air. The good news is there are a bunch of them. Here are a few common sense thoughts:
First realize that the more moisture a plant leaf uses, the more transpiration that will occur, so thirsty plants will humidify your home faster, given that you provide the water. Keep in mind that big leaves mean more leaf surfaces that can transpire. So look for lots of leaves or big leaved plants. Remember that a large leaf surface will collect dust faster than small surfaces; just make sure that you give your plant an occasional shower to clean the leaves. Our homes already provide the tropical environment as far as temperature is concerned, usually set somewhere between 68 – 72 degrees; however, the specific light condition of each place in your home is the variable important to the health of your plants. Here are some varieties of large leaf plants and the light condition that they prefer:
Schefflera Family – tolerate lower light
Philodendron Family – prefer lower light
Aglaonema Family – tolerate really low light
Calathea Family – tolerate really low light
Dracaena Family (do not have broad leaves byt long leaves) – prefer medium light
Second, softer leaves, not thick waxy shiny ones, as a rule will transpire more rapidly. Here are some examples and the light condition that they prefer:
Banana Plants – prefer high light
Piggyback Plants – prefer high light
Wandering Jew – prefer medium-high light
Swedish Ivy (Plectranthus Family) – prefer medium light
I would suggest getting some professional help when you are shopping for plants and letting the pros match your location with a plant that will work best in your home’s specific environment. There is generally a plant for every location if we carefully consider all the variables. Here at the Plant Farm we have one of the widest house plant selections in the Northwest. That’s because we are also a wholesale grower and we supply house plants throughout the Northwest. Our customer base is very diverse and we try to satisfy everyone with something. Over the past 30 years I have grown a lot of different house plants but I still have a few favorites. The first house plant I ever tried was a Hawaiian High Color Spider plant pup given to me by an old gentleman by the name of Fred Metzger. He had a very delightful nursery in the Spokane Valley for years. I used to stop by his place on the way home from school and look with awe at all the beautiful plants in his stock plant house before showing up at the “Salt Mines” down the road, also known as home, for another afternoon of forced child labor. Spider plants are easy and fun and have always worked well in the home in a variety of locations. Maybe you should consider Chinese Evergreens, they work very well in low light situations and there are so many different varieties to choose from. As a rule the Dracaena family is an attractive plant and provides aesthetic appeal as well as functioning as an air filter. I’m going to use a Banana plant a little later this winter, it’s from the Musa family of plants. Since it uses a lot of water and has a large leaf surface it will collect dust and humidify the air. Then when the danger of frost is past I’m going to plant it in my Urban Garden, right outside my kitchen. It can create a little textural contrast in the garden, I doubt that it will bear bananas but if it does I’ll pick them while I’m out gathering my Heirloom tomatoes, that’s right, the ones that I’m going to plant right next to the purple potatoes.
You should try doing your part for the environment; puts some air cleaners in your house.
As my husband and I were shopping the other day, he posed the question, “What will we grow now?” I gave him a puzzled look and said, “What are you talking about? We have poinsettias in the house now.” He replied, “Yes we do have poinsettias. We’ve cleared the space for them and now that Christmas is over we will probably get rid of them so what will we grow now?”
I really didn’t have an answer for him, I hadn’t thought of needing anything but as we kept walking through the store he noticed a display of Amaryllis and Paper white Bulbs. As I turned to look at him I saw the thought cross through his mind and knew that I’d be taking some of those home. Unsure if I wanted to make a commitment to keeping more plants I kept walking, a few minutes later my husband approached with two boxes each containing a two toned Amaryllis.
As we began what I call the compromise stage of buying, he made his case and I could not argue with it. His case was how cool it would be to plant this bulb January first and watch it grow and progress as the month’s progress till spring was here and we could do some real planting. I could not argue with this, so on January 1st we planted our first Amaryllis bulbs, and we are very excited to watch it grown when in reality nothing else is growing.
Here are some quick tips that I found online for Amaryllis care:
Flowering Period: Late December until the end of June.
Flowering time is 7-10 weeks.
Larger bulbs produce more flowers.
Always store un-planted bulbs in a cool place between 40-50 deg. F.
Amaryllis-One of a Kind
Of all flowering bulbs, amaryllis are the easiest to bring to bloom. This can be accomplished indoors or out, and over an extended period of time. The amaryllis originated in South America’s tropical regions and has the botanical name Hippeastrum. The large flowers and ease with which they can be brought to bloom make amaryllis popular and in demand worldwide. The amaryllis comes in many beautiful varieties including various shades of red, white, pink, salmon and orange. There are also many striped and multicolored varieties, usually combining shades of pink or red with white.
Preparation for Planting
The base and roots of the bulb should be placed in lukewarm water for a few hours. Remember, if you cannot plant the bulbs immediately after receiving them, store them at a cool temperature between 40-50 degrees F.
Planting
Plant bulbs in a nutritious potting compost, many are available pre-mixed. Plant the bulb up to its neck in the potting compost, being careful not to damage the roots. Press the soil down firmly to set the bulb securely in place after planting.
Placement and Watering
Plant the bulb, or place the potted bulb in a warm place with direct light since heat is necessary for the development of the stems. The ideal temperature is 68 to 70 degrees F. Water sparingly until the stem appears, then, as the bud and leaves appear, gradually water more. At this point, the stem will grow rapidly and flowers will develop after it has reached full growth.
Flowering Period
Bulbs will flower in 7-10 weeks as a general rule. In winter the flowering time will be longer than in spring. Set up your planting schedule between October and April with this in mind. To achieve continuous bloom, plant at intervals of 2 weeks for stunning color in your home or garden.
After-Bloom Care
After-Flowering. After the amaryllis has stopped flowering, it can be made to flower again. Cut the old flowers from the stem after flowering, and when the stem starts to sag, cut it back to the top of the bulb. Leaf Growth and Development. Continue to water and fertilize as normal all summer, or for at least 5-6 months, allowing the leaves to fully develop and grow. When the leaves begin to yellow, which normally occurs in the early fall, cut the leaves back to about 2 inches from the top of the bulb and remove the bulb from the soil. Bulb Storage. Clean the bulb and place it in a cool (40-50 deg. F), dark place such as the crisper of your refrigerator for a minimum of 6 weeks.Caution: Do not store amaryllis bulbs in a refrigerator that contains apples, this will sterilize the bulbs. Store the bulbs for a minimum of 6 weeks. Plant Again. After 6 weeks you may remove bulbs whenever you would like to plant them. Plant bulbs 8 weeks before you would like them to bloom.
What will you put in the place of your poinsettia?
I am in love with the plant named Spathiphyllum or Peace Lily. It is the greatest and easiest houseplant that I own. The #1 reason I love peace lilies is they are EXTREMELY low maintenance. What I mean by that is that you can abuse it and forget to water for way too long. What I find is a completely wilted, withered plant that looks like it needs to be tossed in the garbage. Instead, I fill up my sink or a bucket of water and submerge the plant under the water until all the bubbles stop. At this point it is rehydrated and ready for the next round. In about 6 hours the plant completely recovers and you will never know it was at the brink of death.
Sometimes I have to cut off one of the blooms because it becomes brown, but the plant comes back to life in front of your eyes. Now, don’t think you can leave on vacation for a month and forget to water it. A plant can not live that long without water unless its a succulent or cactus.
The other reason that I love peace lilies is that they will flourish and even bloom in low light situations. There is not a lot of plants that do very well in low light. This plant not only thrives, it grows healthy leaves, lovely white flowers and looks amazing. It will also do even better if it has plenty of light. I have mine on a desk next to a window in my house. It is a south facing window and it gets pretty hot there in the summer. I have come home many a time, actually way too many times to see a completely wilted plant. I even abuse it even more by having it planted in a metal container. So with the hot sun shining through the window, the metal pot heating up the roots, it’s just amazing that it is still alive.
The variety I have is called Domino and it has variegated leaves making it very striking. There are non variegated varieties also. I have a little bird nest on a stick pushed into the potting soil to add a bit of decoration. I’m kinda weird about that kind of stuff. I like to even accessorize my plants.
I hope you give peace lilies a chance if you are somewhat neglectful to your houseplants. This one is a winner for me.
It’s that time of year again, freezing nights, chill in the air, time to wrap up another year of gardening. I’m hoping you were successful with your gardening projects this year. If they didn’t turn out like you had envisioned, remember there is always next year. Gardening is so forgiving, you have a new start again in spring. Another season to give your ideas a try again, or start a new garden, maybe a cutting garden would be nice.
Some people ask me what to do with their gardens this time of year. “Do I leave them alone until spring, or cut them down in the fall?”
The choice is really yours, but I have some reasons why I prefer to cut them down in the fall.
First off, I have more time in the fall. Spring is a mad rush for doing way too much. I have more things to do than I can possibly ever get done in the spring. I like the non rushing environment of fall. Nobody’s rushing me, I can just do a few hours here and there and if it gets too cold, I can try again later that afternoon or the next day.
Secondly, if you wait until spring to cut down your perennials and pull out your annuals, they will be all slimy from sitting under all the snow all season. All the stems turn black and mushy, sometimes they even get moldy. The main reason that I like to clean up in the fall is that it will discourage pests from nesting in the rotting debris. Slugs, earwigs, roly-poly bugs, mice and other nasty creatures look for spots to lay their eggs that will be safe until spring. Flopped down garden stems make a great place for them. Have you ever cleaned up in the spring and as soon as you grab that big glob of smashed, yucky foliage up from your soil to cut it off, you see tons of bugs scurrying for cover? Well, you had provided a nesting place for those pests over the winter and this is their new family losing their home. Don’t give them a home to nest in. Now I am not saying that if you clean up in the fall, you aren’t going to have any bugs. But what I am saying is that you will reduce your amount of bugs and not have such a big problem from year to year.
Another reason that I like to clean up in fall is that after cutting back my perennials I have room to plant my spring blooming bulbs right next to my chunk of perennials. Let me explain… I love bulbs, love, love, love, tulips, daffodils, crocus, etc. When I cut back in the fall, I dig a hole right beside my perennial chunks. I am basically hugging up to my perennials with my bulb hole. The reason that I do this is so that when spring comes around, the bulbs will be popping their little heads up through the soil before the perennials are even thinking about starting to wake up. The bulbs will grow and bloom while the perennials are just starting to wake up and show growth. In case you didn’t know, bulb foliage needs to dies back naturally to store nutrients for next years blooms. If you cut off the ugly looking foliage of a tulip or daffodil, it won’t bloom for you the next year. You need to leave all the foliage there to slowly turn brown and wither up. The trick to close planting of bulbs next to perennials is that the slowly turning brown part of the bulbs will be camouflaged by the new and vigorous growth of the perennial. You will not even notice that your bulb foliage is looking bad because the new perennial growth will be hovering over it covering it up. It’s really a brilliant way to plant bulbs. Give it a try. I have literally thousands of spring bulbs blooming in my yard and all my perennials hide the withering bulb foliage. It really is a miracle.
The last reason that you should clip and clean in the fall is so that you can put all your yard debris in your compost pile. It will start cookin’ even in the winter when snow is covering your pile. I have a lazy pile. I don’t turn it. I don’t add special things. I just pile it and let it cook. After a year or two there is really wonderful black dirt sitting there just waiting for the taking.